Setting up Mozilla hubs on the local hosts can be easy only if you know the right procedure. This is why we are here to share a complete guide with you.
However, to make things clear, let us understand hubs first.
Hubs is a VR chat room designed for every headset and browser, but it is also an open-source project that explores how communication in mixed reality can come to life. Step inside one of our virtual rooms or build one from the ground up. With Hubs, you can create a room with a single click.
Now, let’s begin the procedure!
Important Note- if in case you did something wrong while following the procedure, just stop and restart your PC.
Requirements:
Software:
- Node js installed
Hardware:
- 8GB RAM
- Fast CPU
Knowledge- you might have great knowledge, but it’s better to learn the basics first.
- Basic CLI Linux
- GitHub Actions
- Remoting VPS via ssh
- Little about the protocol TCP and UDP
- Javascript
- React js
Server:
- VPS with Ubuntu based. Recommended Ubuntu 20.04 LTS.
- Minimum 4 GB RAM. If you want to set it up just for testing then 1 GB RAM is enough.
Let’s start!
To begin, we need to set up the hub on the local system because it’s easy to debug/modify the code on the local system.
1. Install Prerequisite Packages:
1.1. Install Postgres database
Please install Postgres database from this tutorials
https://www.digitalocean.com/community/tutorials/how-to-install-postgresql-on-ubuntu-20-04-quickstart
Remember: Default username and password is postgres. You need to alter it to give super admin permissions. Please run below command.
ALTER USER postgres WITH SUPERUSERPlease change the postgres with username if you have altered the username.
2. Cloning and Preparation
2.1 Reticulum
It’s a backend server for hubs and hubs admin that uses elixir language and phoenix framework. So first, install Elixir and Erlang for the reticulum.
2.1.1 Clone reticulum from github
git clone https://github.com/mozilla/reticulum.git cd reticulum
2.1.2 Erlang (v22) + Elixir (v1.8) + Phoenix
We have installed Elixir 1.8.2 and erlang version 22.3.4.26 on the local system.
Please install Elixir and Erlang from this page
https://www.pluralsight.com/guides/installing-elixir-erlang-with-asdf
Note:On Linux, you may also have to install the erlang-src package for your distribution in order to compile dependencies successfully.
2.1.3 Run below commands
Step 1. Install the dependencies of reticulum with the below command:
mix deps.getStep 2. Create the storage for the given repository.
mix ecto.createNote: If step 2 fails, you may need to change the password for the postgres role to match the password configured dev.exs.
From within the psql shell, enter
ALTER USER postgres WITH PASSWORD 'postgres';If you receive an error that the ret_dev database does not exist, (using psql again) enter create database ret_dev;
Step 3. From the project directory mkdir -p storage/dev
2.1.4 Run Reticulum against a local Dialog instance
Update the Janus host in dev.exs:
dev_janus_host = "hubs.local"Update the Janus port in dev.exs:
config :ret, Ret.JanusLoadStatus, default_janus_host:
dev_janus_host, janus_port: 4443
Add the Dialog meta endpoint to the CSP rules in add_csp.ex:
default_janus_csp_rule =
   if default_janus_host,
      do: "wss://#{default_janus_host}:#{janus_port}
https://#{default_janus_host}:#{janus_port}
https://#{default_janus_host}:#{janus_port}/meta",
      else: ""
2.2. Dialog
Mediasoup based WebRTC SFU for Mozilla Hubs. Using mediasoup RTC will handle audio and video real-time communication. like camera stream, and share screen.
2.2.1. Clone and install dependencies
git clone https://github.com/mozilla/dialog.git
cd dialog
npm install
2.2.2. Setting up secret key
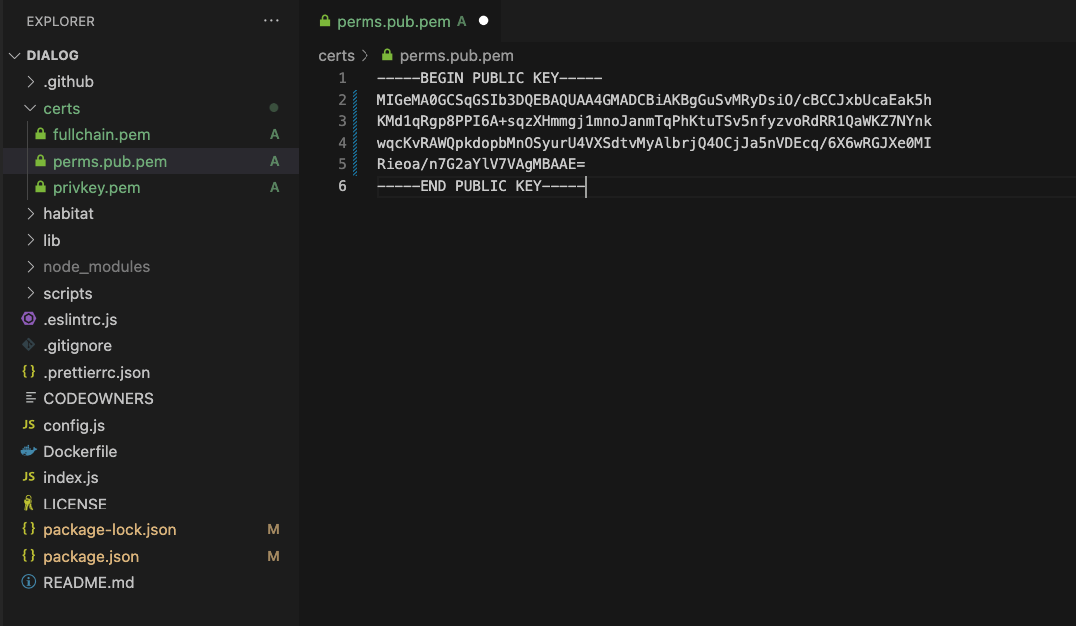
Generate RSA (Public and Private key) with generator online make empty file perms.pub.pem and fill it with RSA Public key
Please check the below screenshots for reference
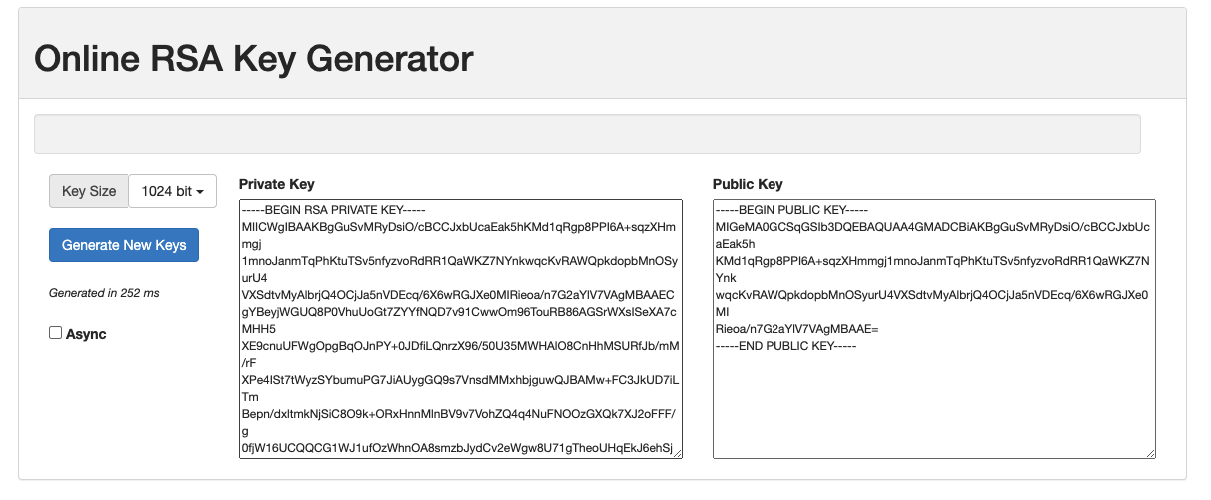
Goto reticulum directory on reticulum/config/dev.exs change PermsToken with the RSA private key that you generated before.
config :ret, Ret.PermsToken, perms_key: "-----BEGIN
RSA PRIVATE KEY----- paste here copied key but add
every line \n before END RSA PRIVATE KEY-----"
Note: please replace the EOF line with \n and make it into one line.
2.2.3. test
2.3. Spoke
Easily create custom 3D environments for Mozilla Hubs. Here you can create/edit the scenes/buildings whatever you call them.
2.3.1. Clone and install dependencies
git clone https://github.com/mozilla/Spoke.git
cd Spoke
yarn install
2.3.2. Set the base routes
We hope you know the basic react-router-dom with the default URL in slash / on localhost:9090
But in the end, we will access the spoke on hubs.local:4000/spoke
So we must set the base URL to /spoke
Add the ROUTER_BASE_PATH=/spoke params to the start command on package.json
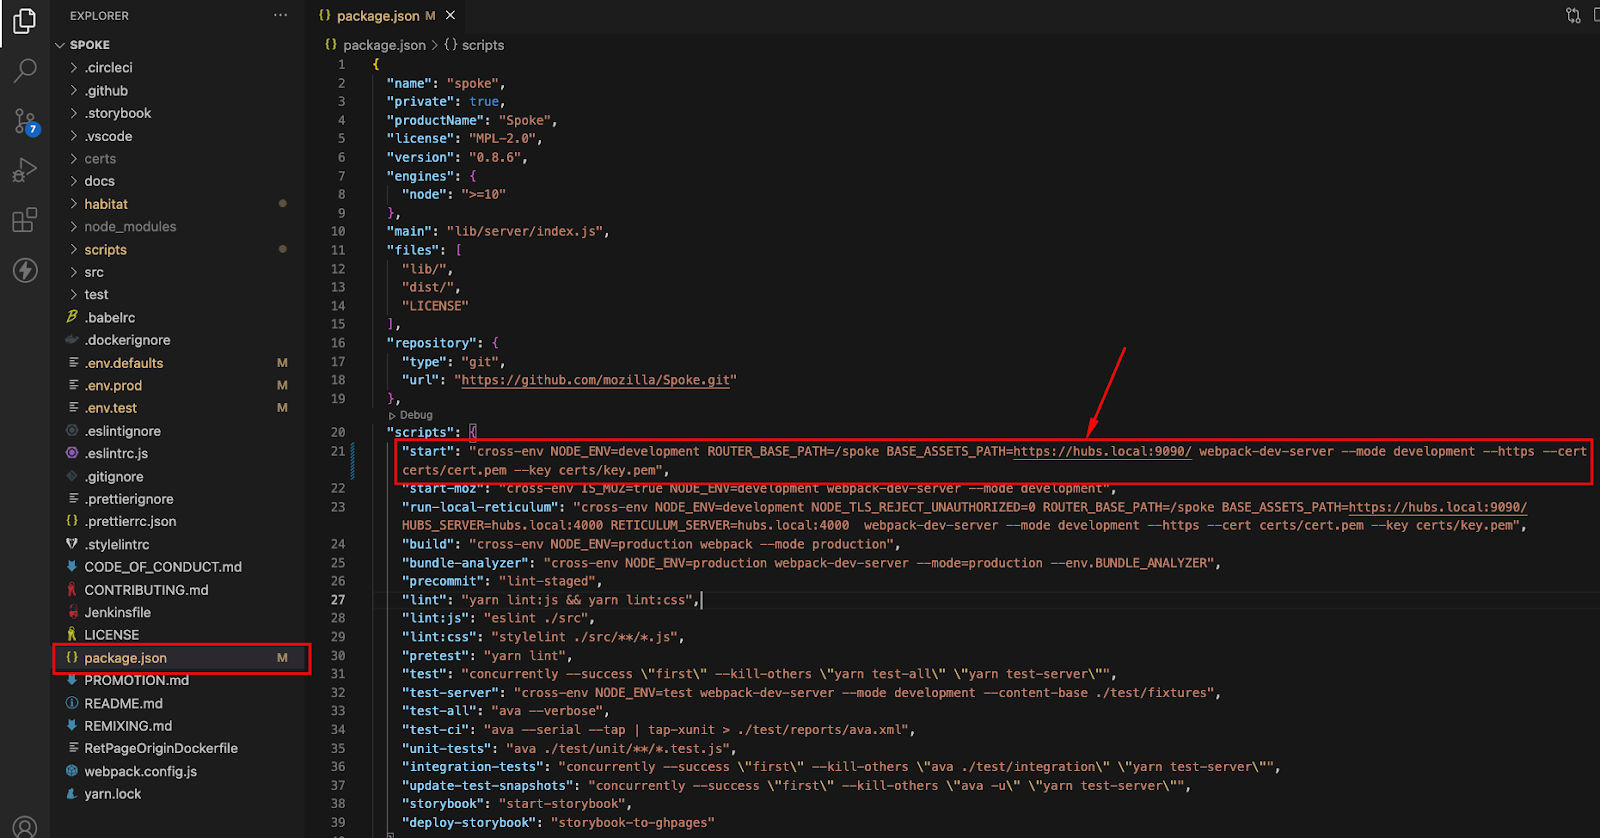
Please check the command below:
cross-env NODE_ENV=development ROUTER_BASE_PATH=/spoke
BASE_ASSETS_PATH=https://hubs.local:9090/
webpack-dev-server --mode development --https --cert
certs/cert.pem --key certs/key.pem
2.3.3. Hubs
2.4. Hubs And Hubs Admin
2.4.1. Clone and install dependencies
git clone https://github.com/mozilla/hubs.git
cd hubs
npm ci
2.4.2.
This repo contains the hub’s client and hub’s admin (hubs/admin). Move to hubs/admin then install dependencies
cd hubs/admin
npm install
3. Setting up HTTPS (SSL)
All the servers must serve with HTTPS. You must generate a certificate and key file.
3.1. Generating certificate and making it trust
Open terminal in reticulum directory run command
mix phx.gen.cert
It will generate key selfsigned_key.pem and certificate selfsigned.pem in the reticulum/priv/cert folder
Rename selfsigned_key.pem to key.pem
Rename selfsigned.pem to cert.pem
Now we have key.pem and cert.pem file
In windows, Please follow the below this
In Mac OS, Open the cert.pem on the tab system, find that certificate then click twice and change to always trust.

Select the cert.pem and key.pem and copy it. Next step we will distribute those two files into hubs, hubs admin, spoke, dialog, and reticulum
first set up in the reticulum.
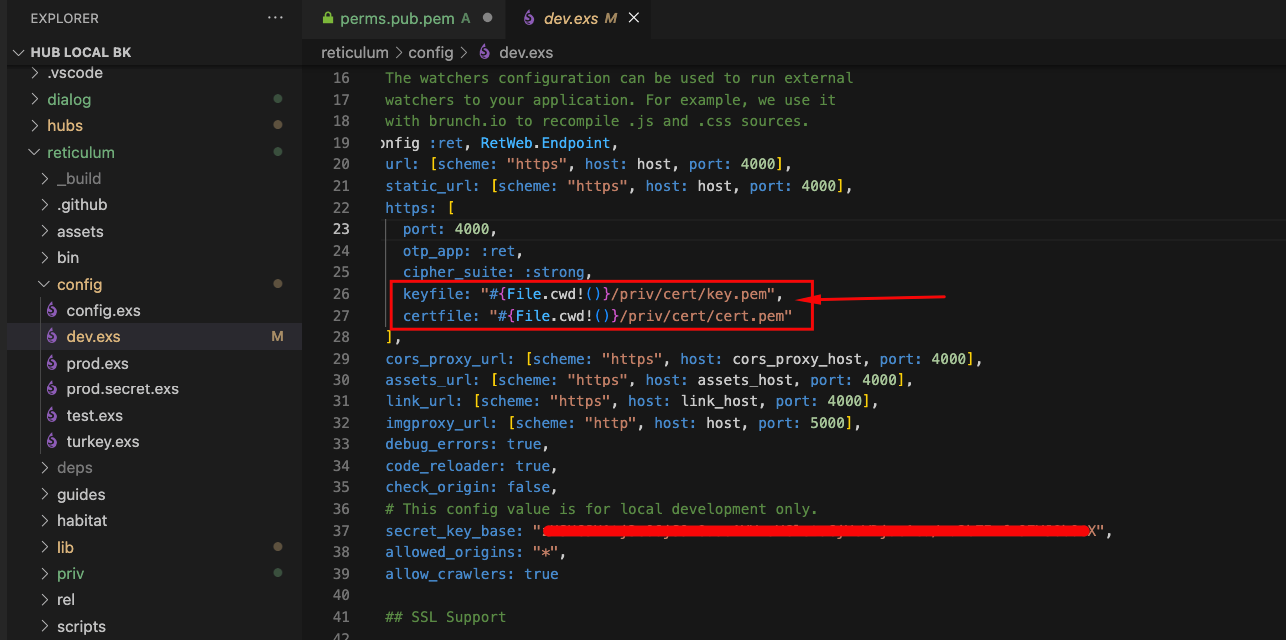
3.2. Setting https for reticulum
On the config/dev.exs We must be setting the path for the certificate and key file.
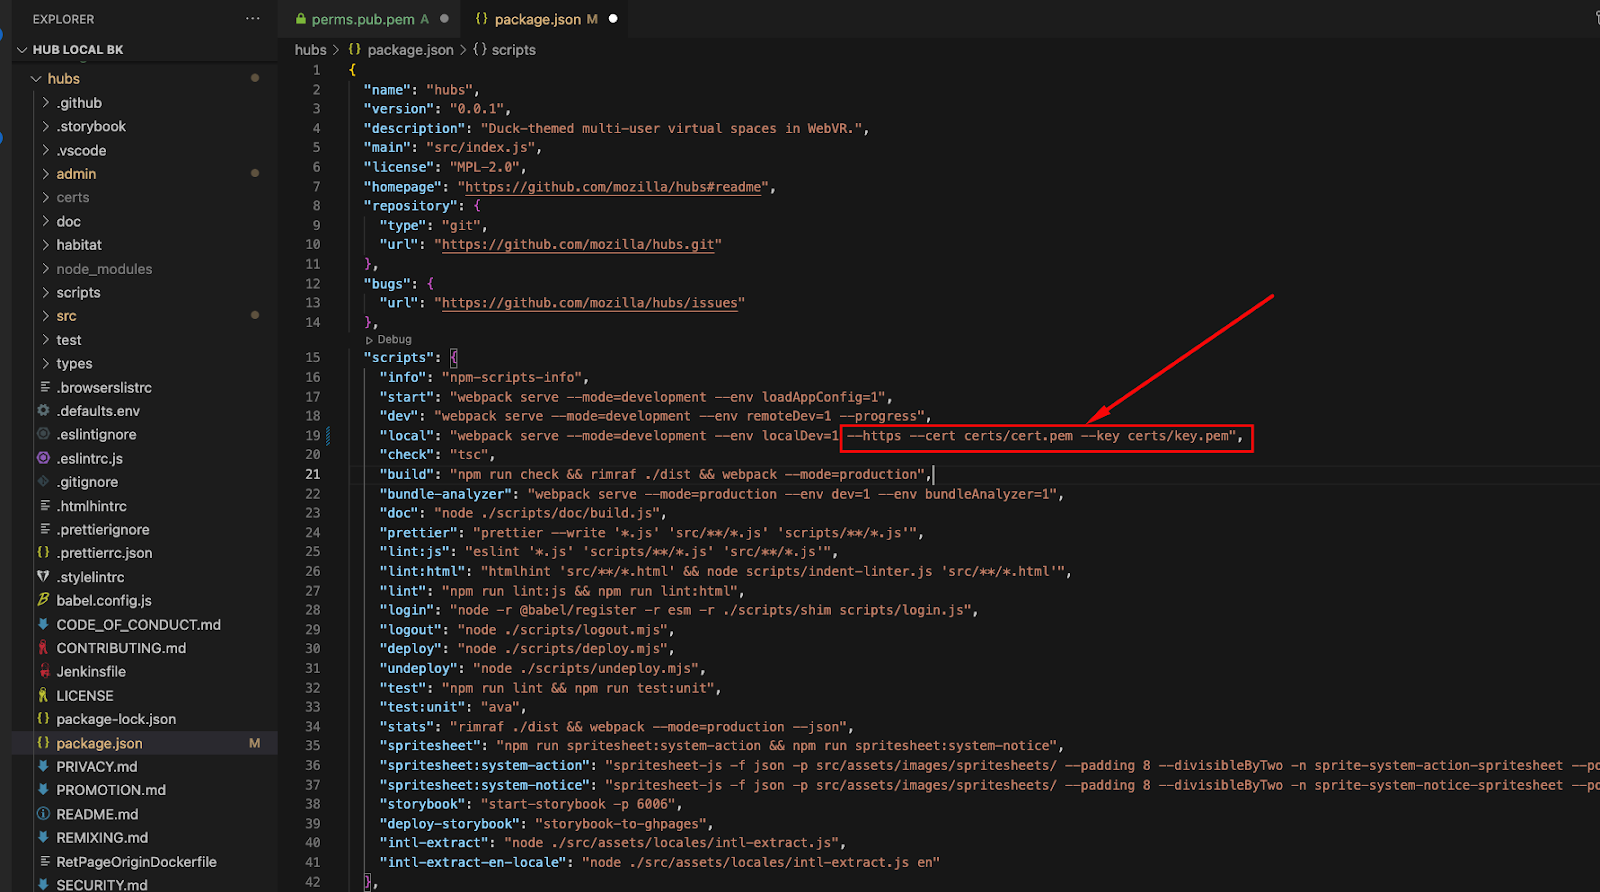
3.3. Setting HTTPS for hubs
Paste key.pem and cert.pem file into hubs/certs
We run hubs with npm run local right?
so add additional params on package.json
--https --cert certs/cert.pem --key certs/key.pem
Like this picture
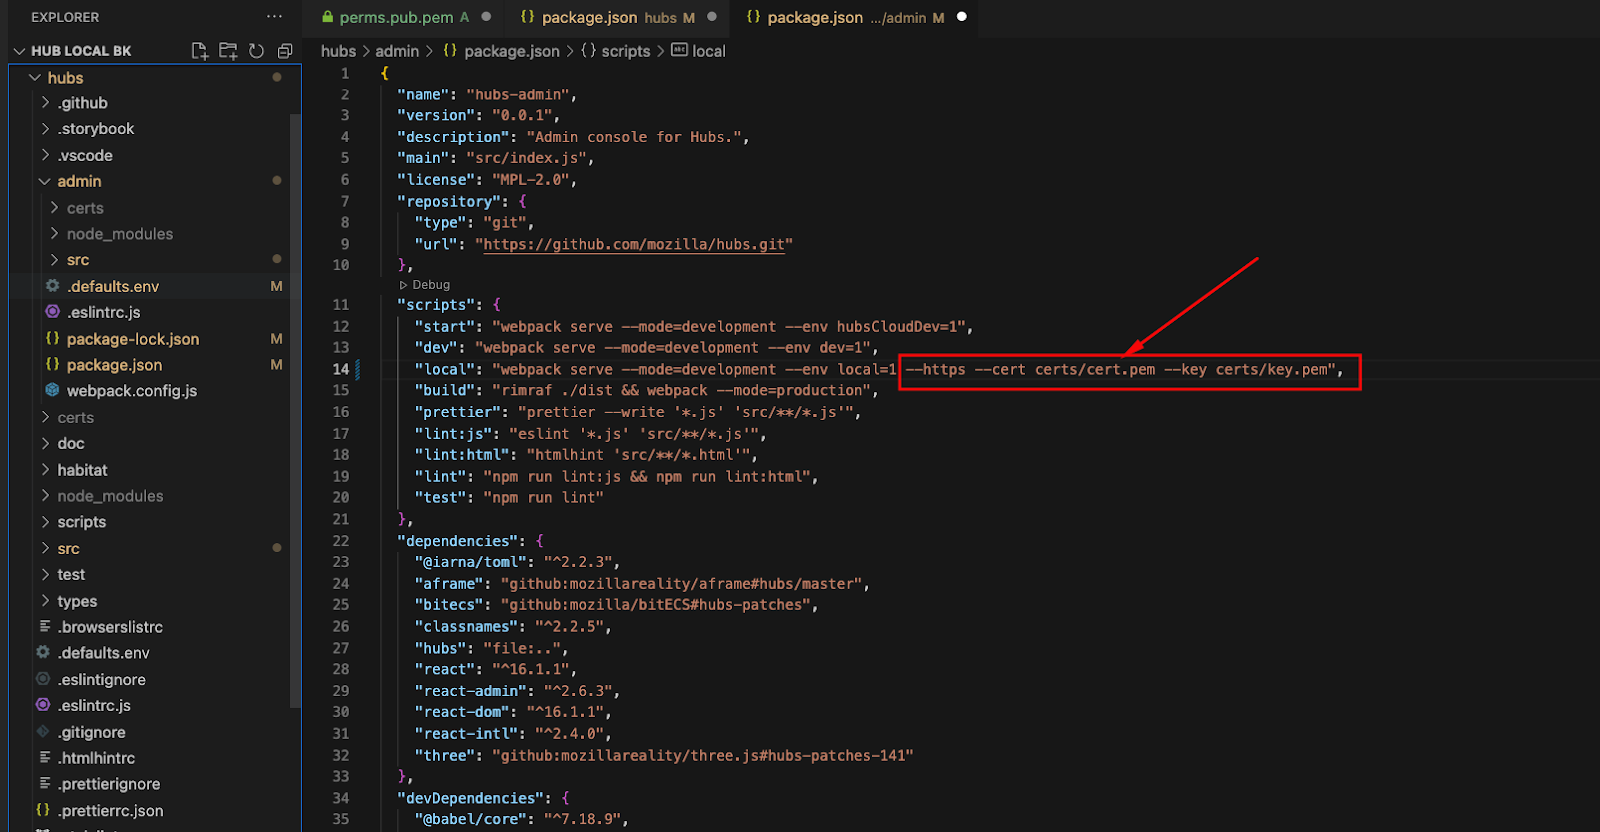
3.4. Setting HTTPS for hubs admin
Paste key.pem and cert.pem file into hubs/admin/certs
Add additional params on package.json
--https --cert certs/cert.pem --key certs/key.pemLike this picture
3.5. Setting HTTPS for spoke
Paste key.pem and cert.pem file into spoke/certs
BASE_ASSETS_PATH = basically we run the spoke on hubs.local:9090
change the start command with below into package.json
cross-env NODE_ENV=development ROUTER_BASE_PATH=/spoke
BASE_ASSETS_PATH=https://hubs.local:9090/
webpack-dev-server --mode development --https --cert
certs/cert.pem --key certs/key.pem
Like this picture

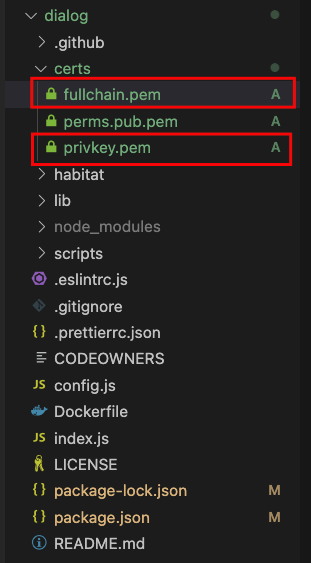
3.6. Setting HTTPS for dialog
Paste key.pem and cert.pem file into dialog/certs
rename cert.pem to fullchain.pem
rename key.pem to privkey.pem
4. Running all the setups
Open five terminals. for each reticulum, dialog, spoke, hubs, hubs admin.

4.1. Run Reticulum
Run the Reticulum with below command:
iex -S mix phx.server
4.2. Run dialog
Edit the start command on the package.json with
MEDIASOUP_LISTEN_IP=127.0.0.1
MEDIASOUP_ANNOUNCED_IP=127.0.0.1
DEBUG=${DEBUG:='*mediasoup* *INFO* *WARN* *ERROR*'}
INTERACTIVE=${INTERACTIVE:='true'} node index.js
For giving params MEDIASOUP_LISTEN_IP and
MEDIASOUP_ANNOUNCED_IP
Start dialog server with command:
npm run start
4.3. Run spoke
Run the spoke with the below command:
yarn start
4.4. hubs and hubs admin
Run the spoke with the below command:
npm run local
4.5. Run postgREST server
Download postREST
sudo apt install libpq-dev
wget https://github.com/PostgREST/postgrest/releases/download/v9.0.0/postgrest-v9.0.0-linux-static-x64.tar.xz
tar -xf postgrest-v9.0.0-linux-static-x64.tar.xz
On reticulum iex (after running the reticulum)
paste this into the terminal
jwk = Application.get_env(:ret, Ret.PermsToken)[:perms_key] |>
JOSE.JWK.from_pem(); JOSE.JWK.to_file(“reticulum-jwk.json”, jwk)
then it will create reticulum-jwk.json in your reticulum root directory
Make reticulum.conf file
nano reticulum.conf
and paste
# reticulum.conf
db-uri =
"postgres://postgres:postgres@localhost:5432/ret_dev"
db-schema = "ret0_admin"
db-anon-role = "postgres_anonymous"
jwt-secret =
"@/absolute_path_to_your_file/reticulum-jwk.json"
jwt-aud = "ret_perms"
role-claim-key = ".postgrest_role"
then the folder looks like this (contains three files)
reticulum/
		postgrest
		reticulum-jwk.json
		reticulum.conf
then run postREST with
postgrest reticulum.conf
Now your setup is ready to run on local. You can access, with lock symbol (SSL secure)
Server URL
Hubs https://localhost:4000
Hubs admin https://localhost:4000/admin
Spoke https://localhost:4000/spoke
Final Takeaway
Finally, you have set up Mozilla hub localhost. We hope this tutorial found helpful to you. However, if you’re still struggling with setup, call us, and we will provide you with an endless solution.