With single sign-on (SSO), users may securely log in to a number of different applications and websites with just one set of credentials. If you want to connect SSO (Single-Sign-On) on Magneto and Mozilla websites, then you will need to use Magneto as an IDP plugin.
Let’s dive into this article, as we have provided an in-depth guide to implementing SSO plugins into Magneto and Mozilla hubs.
Requirements:
- Magento website
- Mozilla Hub website with Reticulum.
- Magento 2 SSO (Single Sign On) Plugin
What is Single Sign-On?
Single sign-on (SSO) is an authentication method that enables users to securely authenticate with multiple applications and websites by using just one set of credentials.
Magento 2 SSO (Single Sign On) Plugin
It enables the Magento shop to be integrated with third-party apps. The user can, however, check in to third-party applications using their Magento 2 sign-up credentials.
What is Magento?
Magento is a platform with built-in PHP, which helps programmers create eCommerce websites. It was released on March 31, 2008, by Varien and developed on Zend Framework.
Up to this time, there are hundreds of thousands of businesses using this open-source to start their online store including big ones like Nike, Samsung, etc.
What is Mozilla Hubs
Hubs is a VR chat room designed for every headset and browser, but it is also an open source project that explores how communication in mixed reality can come to life. Step inside one of our virtual rooms or build one from the ground up. With Hubs, you can create a room with a single click.
How to implement SSO plugin on Magento and Mozilla Hubs website
In Magento website:
- First Download the SSO plugin.
- Install it into Magento website:
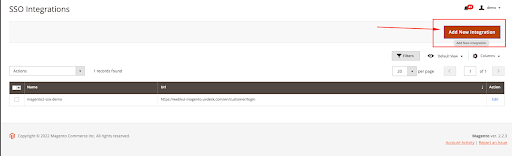
- After installation, it will appear in left admin menu in admin dashboard
Please check the screenshot: - Click on Add New Integration button on the right top in SSO dashboard.
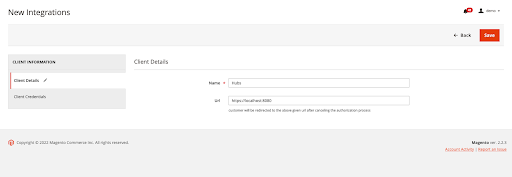
- Fill the details
Name: Hubs
URL: Hubs website URL - Then click on Save button after
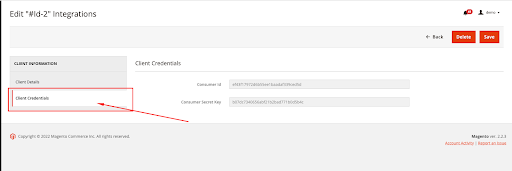
- Now Open it again and client on
- Copy Client Credentials for use this in moodle website
- Now this is ready for use on the moodle website.

Mozilla Hub Website
- First Login to the server via FTP/SFTP or Cpanel/SSH
- Go to the hub’s setup folder.
In Mozilla Hubs website Frontend
- Open Signup Model /src/react-components/auth/SignInModal.js and add a new button with
Now we need to add a custom function for creating our login process and this will
Let’s start: - First Open /src/react-components/auth/VerifyModalContainer.js file add the custom parameter.
Please check the codelet authParams = {} let token = qs.get("token") if ( token && token != "") { authParams = { auth_from: "example.com", token: qs.get("token"), }; } else { authParams = { topic: qs.get("auth_topic"), token: qs.get("auth_token"), origin: qs.get("auth_origin"), payload: qs.get("auth_payload") }; } - Open hubs/src/react-components/auth/AuthContext.js File for call custom function
authChannel.setSocket(socket); if(authParams.auth_from) await authChannel.verifyAuthenticationFromExample(authParams.token); else await authChannel.verifyAuthentication(authParams.topic, authParams.token, authParams.payload); - Open hubs/src/utils/auth-channel.js file for add our custom function after verifyAuthentication function:
// Auth from example.com
verifyAuthenticationFromExample( authToken) {
  const channel = this.socket.channel(`auth:${uuid()}`);
  return new Promise((resolve, reject) => {
    channel.onError(() => {
      channel.leave();
      reject();
    });
    channel
      .join()
      .receive("ok", () => {
        channel.on("auth_credentials", async ({ credentials: token, payload: payload }) => {
          await this.handleAuthCredentials(payload.email, token);
          resolve();
        });
        channel.push("auth_verify_from_example", { token: authToken })
          .receive("error", () => {
            reject()
          });
      })
      .receive("error", () => {
        reject()
      });
  });
}
So far, we have added a button and handle the request that will be returned from the Magento website.
Now we need to validate the token returned by magento and we need to do it in the hub’s backend side which is built in reticulum and phoenix framework and elixir language.
- Then Go to Reticulum(Backend of Hubs) setup folder
- Open /lib/ret_web/channels/auth_channel.ex file in reticulum.
# custom function for login from example def handle_in("auth_verify_from_example", %{ "token" => token }, socket) do Process.send_after(self(), :close_channel, 1000 * 5) if !Map.get(socket.assigns, :used) do :timer.sleep(500) if token != nil do url = "https://example.com/sso/sso/accesscustomerdata?client_id=xxxxxxxxxxxxxxxxxxxxxxxxxxxxxxxx&authToken=#{token}" res = HTTPoison.get!(url) req = Poison.decode!(res.body) accessTokenExist = !!req["response"]["accessToken"] if accessTokenExist do accessToken = req["response"]["accessToken"] # decode JWT access token example_user_details = accessToken |> String.split(".") |> Enum.at(1) |> String.replace_leading("-", "+") |> String.replace_leading("_", "/") |> :base64.decode() |> Poison.decode!() if !!example_user_details["email"] do example_user_email = example_user_details["email"] # Generate access token account = example_user_email |> Account.account_for_email() account_disabled = account && account.state == :disabled if !account_disabled && (can?(nil, create_account(nil)) || !!account) do identifier_hash = example_user_email |> Account.identifier_hash_for_email() decrypted_payload = %{ email: example_user_email } broadcast_credentials_and_payload(identifier_hash, decrypted_payload, socket) else {:reply, {:error, %{}}, socket} end else {:reply, {:error, %{}}, socket} end else {:reply, {:error, %{}}, socket} end else {:reply, {:error, %{}}, socket} end else {:reply, {:error, "Already sent"}, socket} end {:noreply, socket} end - This code will verify the user and if not exist create the user and login it to the hub website.
In Mozilla Hubs Back-end Side Code
Note: Please replace example.com with your Magento website URL and localhost:8080 with your hub website.
Finally, you have connected the SSO plugin with Magneto and Mozilla Hubs. We hope you have found this article helpful. However, if you have any doubts related to Mozilla hubs or Magneto integration, then call our experts.