
The Magneto 2 SSO (Single Sign-On) module enhances local and remote applications by enabling multiple logins. With the help of this module, the user can sign in to their Magneto 2 store and another application at the same time.
This makes it easier to access programs. Customers can use their current login information to access third-party applications like UVdesk. Instead of having to remember distinct passwords for each login, the user can use a single set of credentials across many platforms like Moodle.
So, if you wish to connect SSO 2 Magneto with Moodle, this article provides you with in-depth detail including, Moodle website, steps, and lots more.
Requirements:
- Magento website
- Moodle website
- Magento 2 SSO (Single Sign On) Plugin
What is Single Sign-On?
Single sign-on (SSO) is an authentication method that enables users to securely authenticate with multiple applications and websites by using just one set of credentials.
Magento 2 SSO (Single Sign On) Plugin
It enables the Magento shop to be integrated with third-party apps. The user can, however, check in to third-party applications using their Magento 2 sign-up credentials.
What is Magento?
Magento is a platform with built-in PHP, which helps programmers create eCommerce websites. It was released on March 31, 2008, by Varien and developed on Zend Framework.
Up to this time, there are hundreds of thousands of businesses using this open-source to start their online store including big ones like Nike, Samsung, etc.
What is Moodle
Moodle is a free and open-source learning management system written in PHP and distributed under the GNU General Public License. Moodle is used for blended learning, distance education, flipped classroom and other online learning projects in schools, universities, workplaces and other sectors.
How to implement SSO plugin on Magento and Moodle website
In Magento website:
- First Download the SSO plugin.
- Install it into Magento website:
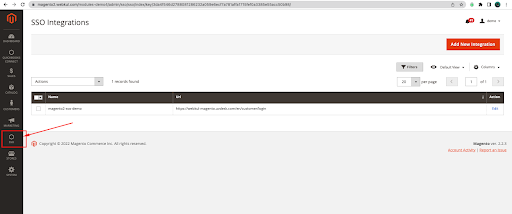
- After installation it will appear in left admin menu in admin dashboard
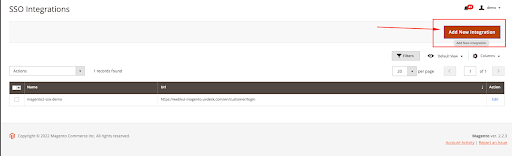
Please check the screenshot: - Click on Add New Integration button on the right top in SSO dashboard.
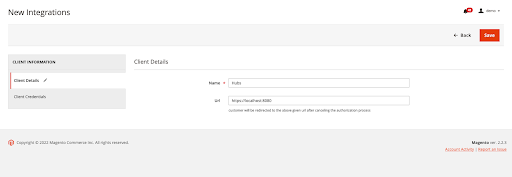
- Fill the details
Name: Moodle
URL: Moodle website URL - Then click on Save button after
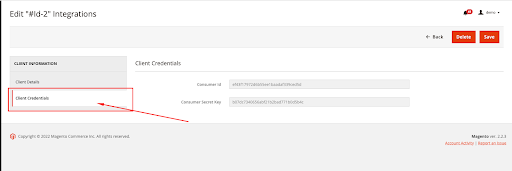
- Now Open it again and client on
- Copy Client Credentials for use this in moodle website
- Now this is ready for use on the moodle website.
Moodle Website
- First Login to the server via FTP/SFTP or Cpanel/SSH
- Go to /my/ Folder and open the index.php File.
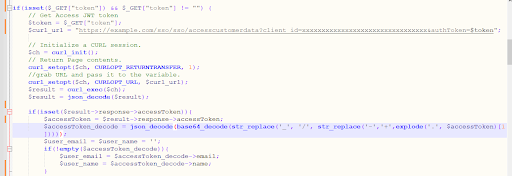
- Add the below code into this file after redirect_if_major_upgrade_required() function:
if(isset($_GET["token"]) && $_GET["token"] != "") {
  // Get Access JWT token
  $token = $_GET["token"];
  $curl_url = "https://example.com/sso/sso/accesscustomerdata?client_id=xxxxxxxxxxxxxxxxxxxxxxxxxxxxxxxx&authToken=$token";

  // Initialize a CURL session.
  $ch = curl_init();
  // Return Page contents.
  curl_setopt($ch, CURLOPT_RETURNTRANSFER, 1);
  //grab URL and pass it to the variable.
  curl_setopt($ch, CURLOPT_URL, $curl_url);
  $result = curl_exec($ch);
  $result = json_decode($result);

  if(isset($result->response->accessToken)){
      $accessToken = $result->response->accessToken;
      $accessToken_decode = json_decode(base64_decode(str_replace('_', '/', str_replace('-','+',explode('.', $accessToken)[1]))));
      $user_email = $user_name = '';
      if(!empty($accessToken_decode)){
          $user_email = $accessToken_decode->email;
          $user_name = $accessToken_decode->name;
      }
      session_start();

      $_SESSION["USER"]->id = 18;
      $_SESSION["USER"]->auth = "manual";
      $_SESSION["USER"]->confirmed = 1;
      $_SESSION["USER"]->deleted = 0;
      $_SESSION["USER"]->username = $user_email;
      $_SESSION["USER"]->firstname = $user_name;
      $_SESSION["USER"]->lastname = $user_name;
      $_SESSION["USER"]->email = $user_email;

      redirect(new moodle_url('/my'));
      exit();;
  } else {
      //Curl Response
      $accessTokenError = $result->response->error;
      echo '
 Error: '.$accessTokenError;
  }
}
Please check the screenshot:
- Add a button on login page and the link of the magento website with redirect_url parameter:
https://example.com/sso/sso/index?client_id=xxxxxxxxxxxxxxxxxxxxxxxxxxxxxxxx&redirect_uri=https://localhost:4000/verify
Note: Please replace example.com with your magento website URL and localhost:4000 with your moodle website.
Conclusion
We hope you have understood the details of connecting SSO Magento with Moodle website. However, if you have any issue, give us a call. Our experts will connect you shortly.